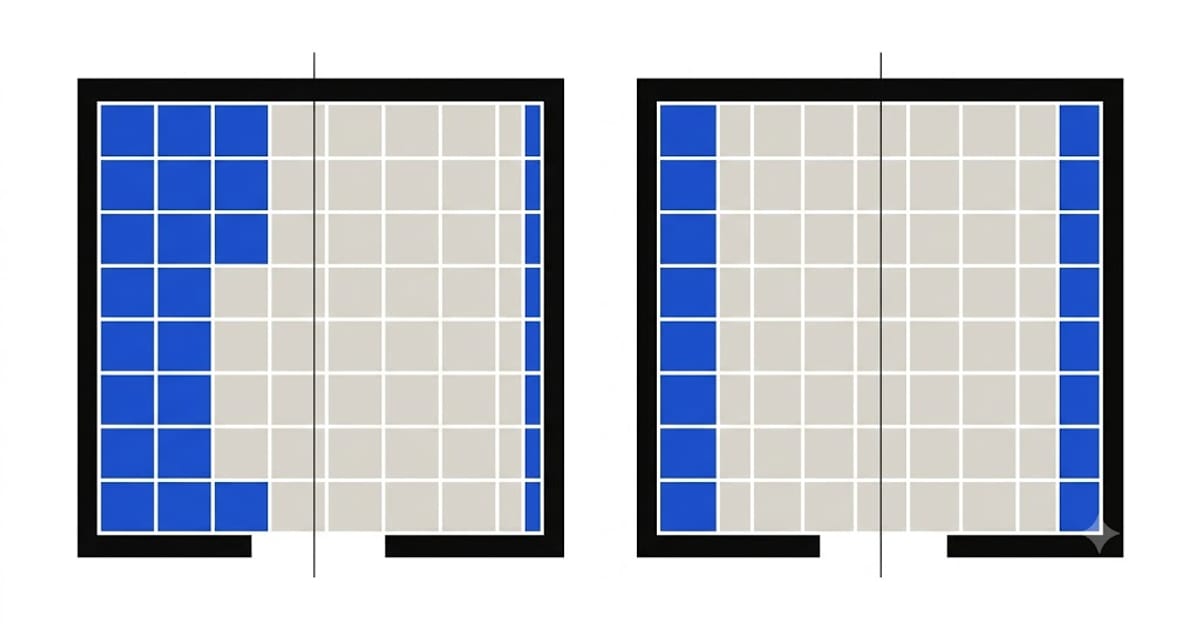
The instinct is to start at a wall and work outward. It fails for two reasons: no wall is straight, and no room is square. Both errors accumulate across the floor and arrive at the far wall as a visibly tapering course.
Set out from the centre instead.
The method
- Measure and mark the centre point of the room.
- Snap two chalk lines through it at exact right angles, checked with a 3-4-5 triangle.
- Dry-lay a row of tiles along each line to the walls, with spacers, without adhesive.
- Look at what lands at each wall.
- Adjust the centre line to fix it.
- Lay from the centre outward.
Step 4 is the whole point of the exercise, and it is the step people skip.
The sliver rule
If the dry lay leaves a cut narrower than half a tile at a wall, shift the whole layout by half a tile. That converts a 2-inch sliver at one wall into a comfortable cut at both.
Narrow slivers are fragile, hard to cut, hard to bed properly, and they draw the eye straight to them. They are the single most common thing that separates a professional-looking floor from an amateur one, and the fix costs nothing but ten minutes with a chalk line.
Balance both directions
The goal is equal cuts at opposite walls, in both axes. A floor with a full tile at one wall and a 3-inch cut at the other reads as crooked even when it is perfectly square.
Which wall matters most
Sometimes perfect balance is impossible and you have to choose where the compromise goes. Put full tiles where the eye lands first:
- The doorway a room is entered through
- The wall a fireplace or vanity sits on
- The visible edge of an island or peninsula
Put the compromise under cabinets, behind a door swing, or along a wall that will be covered by furniture.
Focal points override the centre
In a bathroom, the layout often reads off the shower or the vanity rather than the room centre. In a kitchen, the island. Set the centre line through the focal point and balance from there.
Check the walls before you start
Measure the room diagonally both ways. If the two diagonals differ, the room is not square, and the taper has to go somewhere. Decide where.
Also check for bow: a wall that curves outward by half an inch across its length will produce a cut course that varies by half an inch, and it is better to know that before laying than after.
Doorways and transitions
Plan where the tile stops. A transition strip at a doorway should land under the closed door, so neither room shows the other's flooring.
Where tile meets a different material, the height difference matters — tile plus thinset plus backer board is typically 3/4 to 1 inch above the subfloor, and that step has to be resolved somewhere.